How To Setup Kubernetes Cluster with kubeadm
Introduction
Kubeadm is tool built to provide Kubernetes cluster easily, its developed and maintained by the official Kubernetes community.
What can kubeadm provide?
kubeadm is natively focus on kubernetes component itself, not include a network plugin, and additional (logging,monitoring,etc.) you can install afterward
kubeadm to create, join, upgrade cluster.
kubeadm initkubeadm joinkubeadm upgradekubeadm fit for any workloads, for staging environment, practice lab, and production.
Prerequisites
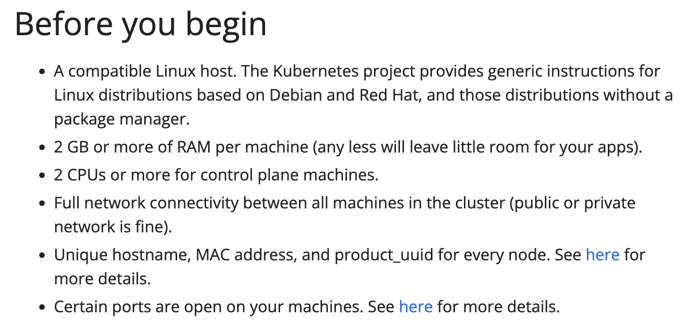
Refer from official documentation, we need at least 2GB RAM per machine and 2 CPUs or more for control plane (master node)
In this tutorial i will use 3 machine with Ubuntu Linux 22.04 LTS, details below:
machine_name, specs, net
kube-master, 2 CPU/4GB Memory, 10.8.13.211
kube-worker1, 4 CPU/8GB Memory, 10.8.13.212
kube-worker2, 4 CPU/8GB Memory, 10.8.13.213
Bootstrap (all machine)
Disable and turn of swap, kubelet component will be failed to start if swap activated.
sed -i '/swap/d' /etc/fstab
swapoff -a
Disable any firewall (ufw)
ufw disableEnable and load kernel module ( overlay, br_netfilter)
cat <<EOF | sudo tee /etc/modules-load.d/k8s.conf
overlay
br_netfilter
EOF

sudo modprobe overlay
sudo modprobe br_netfilter
Sysctl param that needed
cat >>/etc/sysctl.d/k8s.conf<<EOF
net.bridge.bridge-nf-call-ip6tables = 1
net.bridge.bridge-nf-call-iptables  = 1
net.ipv4.ip_forward                 = 1
EOF
Reload directly
sysctl --systemInstall Container Runtime
Container runtime is crucial component , that you know kubernetes is container orchestration, if container runtime not installed, what objects will be orchestrated ? 😄.
Kubernetes use Container Runtime Interface(CRI) to interact with container runtime, CRI is standarized API for interact with container runtime, historically early kubernetes just support docker engine (use dockershim) as container runtime, to increase adoption and flexibility , CRI was created.
Dockershim was removed in Kubernetes v1.24. This decision was made because dockershim created an unnecessary layer of complexity, it's simpler and more efficient for kubelet to interact directly with containerd.
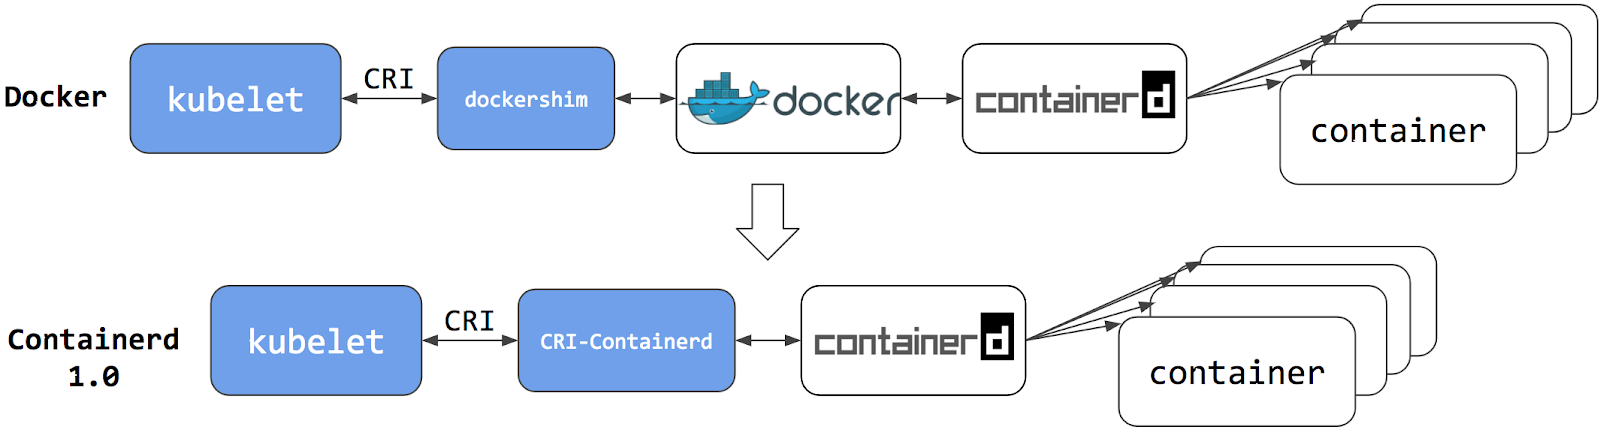
containerD and CRI-O are container runtimes that use the CRI standard, so I'll use one of them.
Install ContainerD (From docker repository)
curl -fsSL https://download.docker.com/linux/ubuntu/gpg | gpg --dearmor -o /etc/apt/keyrings/docker.gpg
echo \
  "deb [arch=$(dpkg --print-architecture) signed-by=/etc/apt/keyrings/docker.gpg] https://download.docker.com/linux/ubuntu \
  $(lsb_release -cs) stable" > /etc/apt/sources.list.d/docker.list
apt-get update -y
apt-get install containerd.io -ySetup containerd and use systemD to manage all containerD process (systemdCgroup=true)
containerd config default > /etc/containerd/config.toml

sed -i 's/SystemdCgroup \= false/SystemdCgroup \= true/g' /etc/containerd/config.toml

systemctl restart containerd
systemctl enable containerd
Install Kubernetes Component
kubeadm: the command to bootstrap the cluster.kubelet: the component that runs on all of the machines in your cluster and does things like starting pods and containers.kubectl: the command line util to talk to your cluster.
Install necessary tools
sudo apt-get install -y apt-transport-https ca-certificates curl gpg
Download the public signing key for the kubernetes package repositories.
curl -fsSL https://pkgs.k8s.io/core:/stable:/v1.33/deb/Release.key | sudo gpg --dearmor -o /etc/apt/keyrings/kubernetes-apt-keyring.gpg
Add apt repository
echo 'deb [signed-by=/etc/apt/keyrings/kubernetes-apt-keyring.gpg] https://pkgs.k8s.io/core:/stable:/v1.33/deb/ /' | sudo tee /etc/apt/sources.list.d/kubernetes.list
v1.33 repository (specifically /core:/stable:/v1.33/deb/) will provide all patch versions for Kubernetes 1.33 (e.g., 1.33.0, 1.33.1, etc.).Update apt index, and install all component
apt-get install -y kubelet kubeadm kubectlHold package, prevent from automatic update
apt-mark hold kubelet kubeadm kubectlEnable kubelet
systemctl enable --now kubeletInitialize Kubernetes Control Plane (Master)
Pull required image
kubeadm config images pullInitialize cluster
kubeadm init --apiserver-advertise-address=10.8.13.211 --pod-network-cidr=172.24.0.0/24If the output command is like below, your cluster is successfuly initialized:
Your Kubernetes control-plane has initialized successfully!

To start using your cluster, you need to run the following as a regular user:

  mkdir -p $HOME/.kube
  sudo cp -i /etc/kubernetes/admin.conf $HOME/.kube/config
  sudo chown $(id -u):$(id -g) $HOME/.kube/config

Alternatively, if you are the root user, you can run:

  export KUBECONFIG=/etc/kubernetes/admin.conf

You should now deploy a pod network to the cluster.
Run "kubectl apply -f [podnetwork].yaml" with one of the options listed at:
  https://kubernetes.io/docs/concepts/cluster-administration/addons/

Then you can join any number of worker nodes by running the following on each as root:

kubeadm join 10.8.13.211:6443 --token 3nnah5.7uee68aifx09ft2x \
        --discovery-token-ca-cert-hash sha256:4cb36553866f9dabc80b24cc98c65d392e009244318575c64b2eac0bd3387c54
Interact with cluster, export KUBECONFIG path
export KUBECONFIG=/etc/kubernetes/admin.conf
Testing , get kubernetes nodes
kubectl get nodes
NAME           STATUS     ROLES           AGE     VERSION
kube-master    NotReady   control-plane   20m     v1.33.1
Join Kubernetes Worker Node
Run in all worker machine
This command is in output when initialize kubernetes master kubeadm init
kubeadm join 10.8.13.211:6443 --token 3nnah5.7uee68aifx09ft2x \
        --discovery-token-ca-cert-hash sha256:4cb36553866f9dabc80b24cc98c65d392e009244318575c64b2eac0bd3387c54
or run this command to retrieve join command
kubeadm token create --print-join-commandGet status node, after join
kubectl get nodes
NAME           STATUS     ROLES           AGE   VERSION
kube-master    NotReady   control-plane   20m   v1.33.1
kube-worker1   NotReady   <none>          15m   v1.33.1
kube-worker2   NotReady   <none>          15m   v1.33.1
Installing Network Plugin
kubeadm does not configure network plugin, you need install separately, kubernetes have a standard for networking plugin, called Container Network Interface(CNI).
CNI Plugin implement overlay network and routing(virtual network that spans across all kubernetes node) and handles inter-communication pod in cluster.
pod-network-cidr that we configure in kubedm init is handled by CNI IPAM (IP Address Management), real component that managing this allocation is CNI, in kubeadm init it just defined address space.
I am using Cilium network plugin to this setup
Install Cilium CLI
CILIUM_CLI_VERSION=$(curl -s https://raw.githubusercontent.com/cilium/cilium-cli/main/stable.txt)

CLI_ARCH=amd64

if [ "$(uname -m)" = "aarch64" ]; then CLI_ARCH=arm64; fi
curl -L --fail --remote-name-all https://github.com/cilium/cilium-cli/releases/download/${CILIUM_CLI_VERSION}/cilium-linux-${CLI_ARCH}.tar.gz{,.sha256sum}

sha256sum --check cilium-linux-${CLI_ARCH}.tar.gz.sha256sum

sudo tar xzvfC cilium-linux-${CLI_ARCH}.tar.gz /usr/local/bin
rm cilium-linux-${CLI_ARCH}.tar.gz{,.sha256sum}
Deploy Cilium
cilium install

ℹ️  Using Cilium version 1.17.2
🔮 Auto-detected cluster name: kubernetes
🔮 Auto-detected kube-proxy has been installed
Get Cilium Status
cilium status


/¯¯\
 /¯¯\__/¯¯\    Cilium:             1 errors, 2 warnings
 \__/¯¯\__/    Operator:           OK
 /¯¯\__/¯¯\    Envoy DaemonSet:    1 errors
 \__/¯¯\__/    Hubble Relay:       disabled
    \__/       ClusterMesh:        disabled

DaemonSet              cilium                   Desired: 3, Unavailable: 3/3
DaemonSet              cilium-envoy             Desired: 3, Ready: 1/3, Available: 1/3, Unavailable: 2/3
Deployment             cilium-operator          Desired: 1, Ready: 1/1, Available: 1/1
Containers:            cilium                   Running: 3
                       cilium-envoy             Running: 3
                       cilium-operator          Running: 1
                       clustermesh-apiserver
                       hubble-relay
Cluster Pods:          2/2 managed by Cilium
Helm chart version:    1.17.2
Image versions         cilium             quay.io/cilium/cilium:v1.17.2@sha256:3c4c9932b5d8368619cb922a497ff
2ebc8def5f41c18e410bcc84025fcd385b1: 3
                       cilium-envoy       quay.io/cilium/cilium-envoy:v1.31.5-1741765102-efed3defcc70ab5b263
a0fc44c93d316b846a211@sha256:377c78c13d2731f3720f931721ee309159e782d882251709cb0fac3b42c03f4b: 3
                       cilium-operator    quay.io/cilium/operator-generic:v1.17.2@sha256:81f2d7198366e8dec29
Check Kubernetes node status
kubectl get nodes

NAME           STATUS   ROLES           AGE   VERSION
kube-master    Ready    control-plane   25m   v1.33.1
kube-worker1   Ready    <none>          20m   v1.33.1
kube-worker2   Ready    <none>          20m   v1.33.1
Deploy Simple App (Nginx)
For simple testing we deployed nginx use nginx:alpine image
kubectl create deployment nginx-arya-testing --image nginx:alpine --replicas 3Check pod status
kubectl get pod -o wide

NAME                                  READY   STATUS    RESTARTS   AGE   IP             NODE           NOMINATED NODE   READINESS GATES
nginx-arya-testing-6c78fddb4f-5z24b   1/1     Running   0          12s   172.24.1.103   kube-worker1   <none>           <none>
nginx-arya-testing-6c78fddb4f-fz4mr   1/1     Running   0          12s   172.24.0.59    kube-worker2   <none>           <none>
nginx-arya-testing-6c78fddb4f-mp8nf   1/1     Running   0          12s   172.24.1.90    kube-worker1   <none>           <none>
Testing access app inside cluster
curl http://172.24.1.103Result:
<!DOCTYPE html>
<html>
<head>
<title>Welcome to nginx!</title>
<style>
html { color-scheme: light dark; }
body { width: 35em; margin: 0 auto;
font-family: Tahoma, Verdana, Arial, sans-serif; }
</style>
</head>
<body>
<h1>Welcome to nginx!</h1>
<p>If you see this page, the nginx web server is successfully installed and
working. Further configuration is required.</p>

<p>For online documentation and support please refer to
<a href="http://nginx.org/">nginx.org</a>.<br/>
Commercial support is available at
<a href="http://nginx.com/">nginx.com</a>.</p>

<p><em>Thank you for using nginx.</em></p>
</body>
</html>
Testing access outside cluster, first create services with type nodePort
kubectl expose deployment/nginx-arya-testing --type=NodePort --port=80 Get nodePort services
kubectl get services
NAME TYPE CLUSTER-IP EXTERNAL-IP PORT(S) AGE
kubernetes ClusterIP 10.96.0.1 <none> 443/TCP 24h
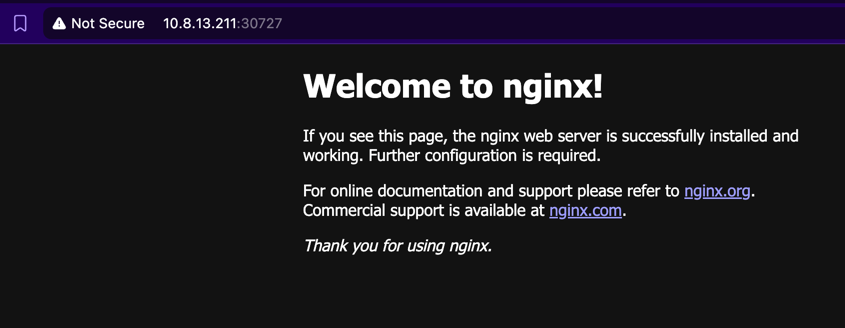
nginx-arya-testing NodePort 10.103.193.85 <none> 80:30727/TCP 5sYou can access to nginx use port 30727
Conclusion
Deploy kubernetes cluster with kubeadm is very straightforward, its easily to understand for beginner, also can use for production grade, but if you look at tools that have advanced feature like autoscaling node and etc, kubeadm don't provide this, you can use K0ps or managed kubernetes (GKE/AKS/EKS).
Reference